I went strawberry picking… Now what?

I celebrated my birthday last Saturday and Rob planned a pretty interesting day but one of the highlights for me was strawberry picking.

I was so excited! If I had to eat one fruit for the rest of my life, it would definitely be strawberry.  It’s sweet and tangy. It’s red. It’s cute. It smells delectable. It’s bite sized. It makes the best jams, jellies, fillings, frostings, toppings, ice creams, juices (I can go on and on but there is more to this post than strawberry picking and I don’t want to bore you to death with ramblings)inhales deeply…AND I read that it helps fight cancer… just saying.

Rewinding to a couple days ago… we got to Froberg’s Farm in Alvin, TX and eagerly bought ourselves a bucket each. At that point, I think we were too giddy to rationally think through how many pounds of berries we would each pick that day.

Glee overwhelmed me. My routine went something like this: spot red juicy berry, pick it, toss it into bucket, admire harvest at hand, smile and scout more berries. When my bucket was half way full I remembered why I carried my camera. Please enjoy the photos below.

As we walked back to weigh and cash our berries… Rob suddenly came to his senses… “Wait! How many pounds of berries do you think we picked?” We looked at each other with brief worry in our faces then laughed it off.

“It can’t be more than two or three pounds man.” Candice replied boldly. I like referring to myself in the third person sometimes. *ehhem*

It so happened that we picked 7.42 pounds; approx. 119 ounces; approx. 30ish cups… of strawberries. That’s probably 50ish of my handfuls.

The challenge: Make use of 7.42 pounds of strawberries in 4 days. Challenge accepted! Let us begin looking at some berry yummy recipes. *snicker*

Uno.

Chocolate Covered Strawberries: These were very easy to make and oh so yummy! Warning: Do not eat more than 6 in one sitting. You are bound to get a tummy ache. Don’t like chocolate? No worries… I gots plenny more recipes to share.

Two.

Strawberry Tart Cake: This cake was the perfect amount of sweet and berry.

Third.

Sharing is caring yo. Give to your family, friends, strangers on the street. Start dispersing dem berries in every which way you can.

4.

Strawberry Jam: This was by far the yummiest jar of strawberry jam I have ever had. Yes, matter of factly, it does have something to do with me actually making it myself. The recipe was simple and result is superb. Try it! Rob and I had some on a couple of Club crackers with cream cheese. Mmmmm mmmm mmmmM.        Note: Be sure to follow proper canning rules to store you jam.

Last but not least.

Strawberry Mini Pies: These were definitely my favourite. As you can see, I could hardly wait to try one… I even used the same jam that I made in no. 4 as my filling. You can use strawberry butter if you prefer.

So there you have it. If ever you are in a similar predicament as I, here is a simple guide to give you a start on using up your berries before they go bad.

Enjoy!

Easy Donuts

My first attempt at making donuts was a failure. I found the recipe online and they were suppose to be baked. I think they were called apple baked donuts or summin. Anywho, I wasn’t going to allow one failed attempt the discourage me from trying them again.

While browsing one of my favourite blog sites, A Beautiful Mess, I found a super easy recipe for making donuts! Just my luck right?

So here’s what you need and how you do it.

1. Store bought canister of biscuits.

{I actually had a canister of butter crescents so I used that instead but either shall do. Also, I added a bit of flour to my surface so that the dough won’t stick to it}

2. Roll dough out and cut donut holes. A cookie cutter or drinking glass or cup would suffice.

3. Heat oil for frying. You can use the donut holes to test the oil’s temperature.

4. Fry until golden brown.

{After frying, let cool}

5. After they are completely cooled, glaze and decorate.

{mmm mmm good…}

6. Finally… enjoy!

{Lick your fingers good}

For your dough you will need:

-1 or 2 store bought canister of biscuits (I got 10 donuts from my one canister of crescents)

-A little flour for rolling

-Enough oil to fry your donuts

For glaze you will need:

-2 cups powdered sugar

-3 tablespoons hot water

-2 tablespoons milk

-1/2 teaspoon vanilla extract (use clear extract for white icing)

Mix all ingredients together in a bowl and dip donuts into glaze. Place on a cooling tray until glaze is set.

Go forth and make donuts! 

Lemon Bars

Once upon a time, I avoided lemon flavoured desserts. It seemed wrong to me that dessert would be made with lemons. They’re acidic and too tangy people! They will just ruin the perfect dessert!

Silly Candice. One should not make an opinion about something unless one has tried it thyself. Then one is granted all privilege to make judgements on said thing.

My view changed when I had a slice of Lemon Meringue Pie from a friend. I was in disbelief that something so err …unpleasant… would make my taste buds dance and sing to the heavens! “If lemon be the food of love, eat on!” Sayeth my tongue. 

On Sunday night, I decided to try Lemon Bars. We were expecting my uncle for dinner and I needed a dessert that was little prep and little bake time. On my first attempt I made one blunder. In the original recipe, the baker made her bars in a 9 x 13 pan. I on the other hand, made mine in a rectangular shaped cupcake baking pan. So the dimensions were smaller. Shamefully, I baked my bars in the same amount of time it took the 9 x 13 pans and burnt them all. *hangs head in shame* They were surprisingly good though. My uncle ate and licked his plate to boot. No, that last part did not happen but he said it was good and ate all of it!

Two tablespoons of perfection, a cup of determination and a constant nagging in my head pressed me to revisit the recipe with minor alterations. I baked the crust in half the original time but baked the filling in its original time, which equaled to SCRUMDIDDLYUMPTIOUSNESS!

P.S. I also halved the original recipe.

Here! The recipe [plus pictures] for all, from Bakerella.

Lemon Bars

Crust:
1 cup butter
1 3/4 cup flour
2/3 cup confectioner’s sugar (plus more for dusting)

Topping:
1 1/2 cup plain sugar
1/4 cup flour
1 tsp baking powder
4 eggs, slightly beaten
1/2 cup lemon juice

Preheat oven to 350 degrees
Grease and flour a 9 X 13 pan

To make crust:

  • In a medium bowl, whisk together flour and confectioner’s sugar
  • Cut in butter until combined and crumbly.
  • Press mixture into bottom of pan.
  • Bake for 20 minutes or until golden.

To make topping:

  • While crust is baking, prepare topping.
  • In a larger bowl, add sugar, flour, and baking powder.
  • Then add slightly beaten eggs and lemon juice.
  • Mix well and pour on top of warm baked crust.
  • Bake for 20-25 minutes.
  • When cool, dust with confectioner’s sugar and refrigerate.
  • Cut into bars and enjoy them cold!

{Getting my hands dirty. Pressing the crust into the pan}

{They look so ugly when they’re done. Urgh. I will spare you the details of my sister’s description of them}

{Half a cup full of powdered sugar helps the lemons go down -tehe}

{Bon Appetit}

Aunty Lorraine’s Carrot Cake

Today I’m sharing a carrot cake recipe. I got it from my friend, Lorraine. She’s an exceptionally good cook and her carrot cake is the best I have ever had. Its soft, not too sweet and simply perfect.

{Fresh out the oven}

{Cooled and ready for frosting}

{Bon Apitoie}

Aunty Lorraine’s Carrot Cake

Ingredients

1 ½ c. flour

1 c. sugar

3 eggs

1 ½ tsp baking soda

1 ½ tsp baking powder

1 tsp cinnamon

1 c. corn oil

2 c. grated carrots

½ tsp salt

½ c. walnut (optional)

Method

  1. Put oil & sugar in mixing bowl and beat for 5 mins.
  2. Add eggs and beat one at a time.
  3. Sift all dry ingredients together and add.
  4. Add carrots & walnuts.
  5. Bake at 325 degrees for 50-60 mins. (20 mins for cupcakes – makes approx. 24)

I got the cream cheese frosting recipe from Cannella Vita. I really like this one because the cream cheese flavour isn’t very pungent like others I’ve had. I think all the ingredients are blended perfectly to create a really sweet but mild flavour. Try it! It’s my favourite! (On a side note, I halved the frosting ingredients and still had a little left over after frosting my cupcakes.)

Cream Cheese Frosting

  • 1/2 cup of shortening
  • 1/2 cup (one stick) unsalted butter @ room temp
  • 1 8oz bar cream cheese @ room temp
  • 1 Tbs. white vanilla extract
  • 2 lbs ( 8 cups) powder sugar
  • 1/2 tsp salt

Instructions

Cream together shortening, butter and cream cheese until nice and smooth. Add vanilla into mixture and combine. Sift together sugar and salt, and slowly add to shortening, butter & cheese mixture. Make sure that all sugar is incorporated. Enjoy!

Countdown::dayThirty

Today my 30 day countdown until I say, “I do.” begins! I’ve been thinking a lot about how I wanted to present this challenge. Pictures or video or both? I really can’t make up my mind so I think it would have to be a mix up of everything. Some days I am sure I will be able to do video and other days I may only  be able to do photos… so… I decided to mix it all up and hopefully keep it fun, ha!

Today I present you with photo AND video! You may chime in with your “Ooows”… “Aaahs”… Yes people. Today is a good day. Haha.

Picture Imperfect?

Even though its not the best photo, this is one of my favourite photos of Rob & I. I love his smirk, that he’s not paying attention to the camera person and how sexy he looks in his suit 😛 I don’t remember exactly what caught his attention but from my expression one can tell that I was trying really hard to catch it as well. Haha.

Do enjoy today’s video.

S’more Bites

I stumbled upon this snack recipe on Cooking Classy and wanted to try it for quite a while now.

I love chocolate, I love me some marshmallows and graham crackers are pretty yummy when accompanies by either of the aforementioned. I altered the recipe a bit btw. So here’s what ya need and gotta do.

Ingredients:
6 graham cracker sheets*, or 12 Saltine or Ritz Crackers (or as many as you wish)
6 large marshmallows (enough to fit your crackers)
12 Hershey’s Kisses, unwrapped (enough to top your crackers)

Directions:
1. Break graham cracker sheets in half.

2. Using clean scissors (or a clean knife) cut each marshmallow into 2 halves.

3. Heat oven to Low Broil.

4. Align graham crackers in the center of a cookie sheet about 1/2″ apart from each other.

5. Top each graham cracker with a marshmallow with the cut/sticky side down.

6. Place marshmallow topped graham crackers under broiler (turn oven light on if you have one) DON’T WALK AWAY, watch them closely as they will toast quickly, allow to toast until golden rotating pan with oven mitt as needed.

7. Once golden immediately remove from oven, place 1 Kiss in the center of each toasted marshmallow and gently press down.  For best results serve warm, just like a real S’more.

8. Enjoy!

I only made six this morning but you can do as many as you wish… or can eat, lol. Below are some shots I took while making them.

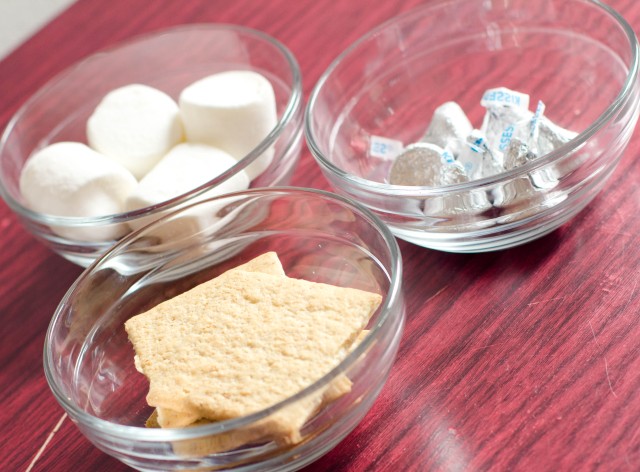
You will need: graham crackers, marshmallows, hershey’s kisses.

Try not to eat them all as you cut them – tehe.

Put oven on Broil. Wait a little bit for it to heat up.

Put those sugary babies in! Close oven and wait a couple secs. Remember, DO NOT WALK AWAY.

They will turn golden brown and smell heavenly…

Place Kisses on top. Eat. Enjoy 🙂

The Decker Family

We were so blessed to have good weather for Sunday’s shoot. I was worried that the rains would have ruined the day. The Deckers were very pleasant and adorable. Little Andreas was such a sweetie pie until he got a little cranky close to the end of the shoot, chuckle. I really loved how well they connected and the sweet relationship each parent has with Andreas. Aren’t they just precious? 🙂

{How sweet}

{An “aww” moment}

{All smiles}

{“Stop it guys…. You’re smothering me.”}

{Look at me strut}

{Such a cute, little silly face}

{Mommy’s Little Darling}