
Day Seven: Something you spend hours doing
{I spend a lot of hours in the kitchen. Cooking. Baking. Tasting}

Day Seven: Something you spend hours doing
{I spend a lot of hours in the kitchen. Cooking. Baking. Tasting}
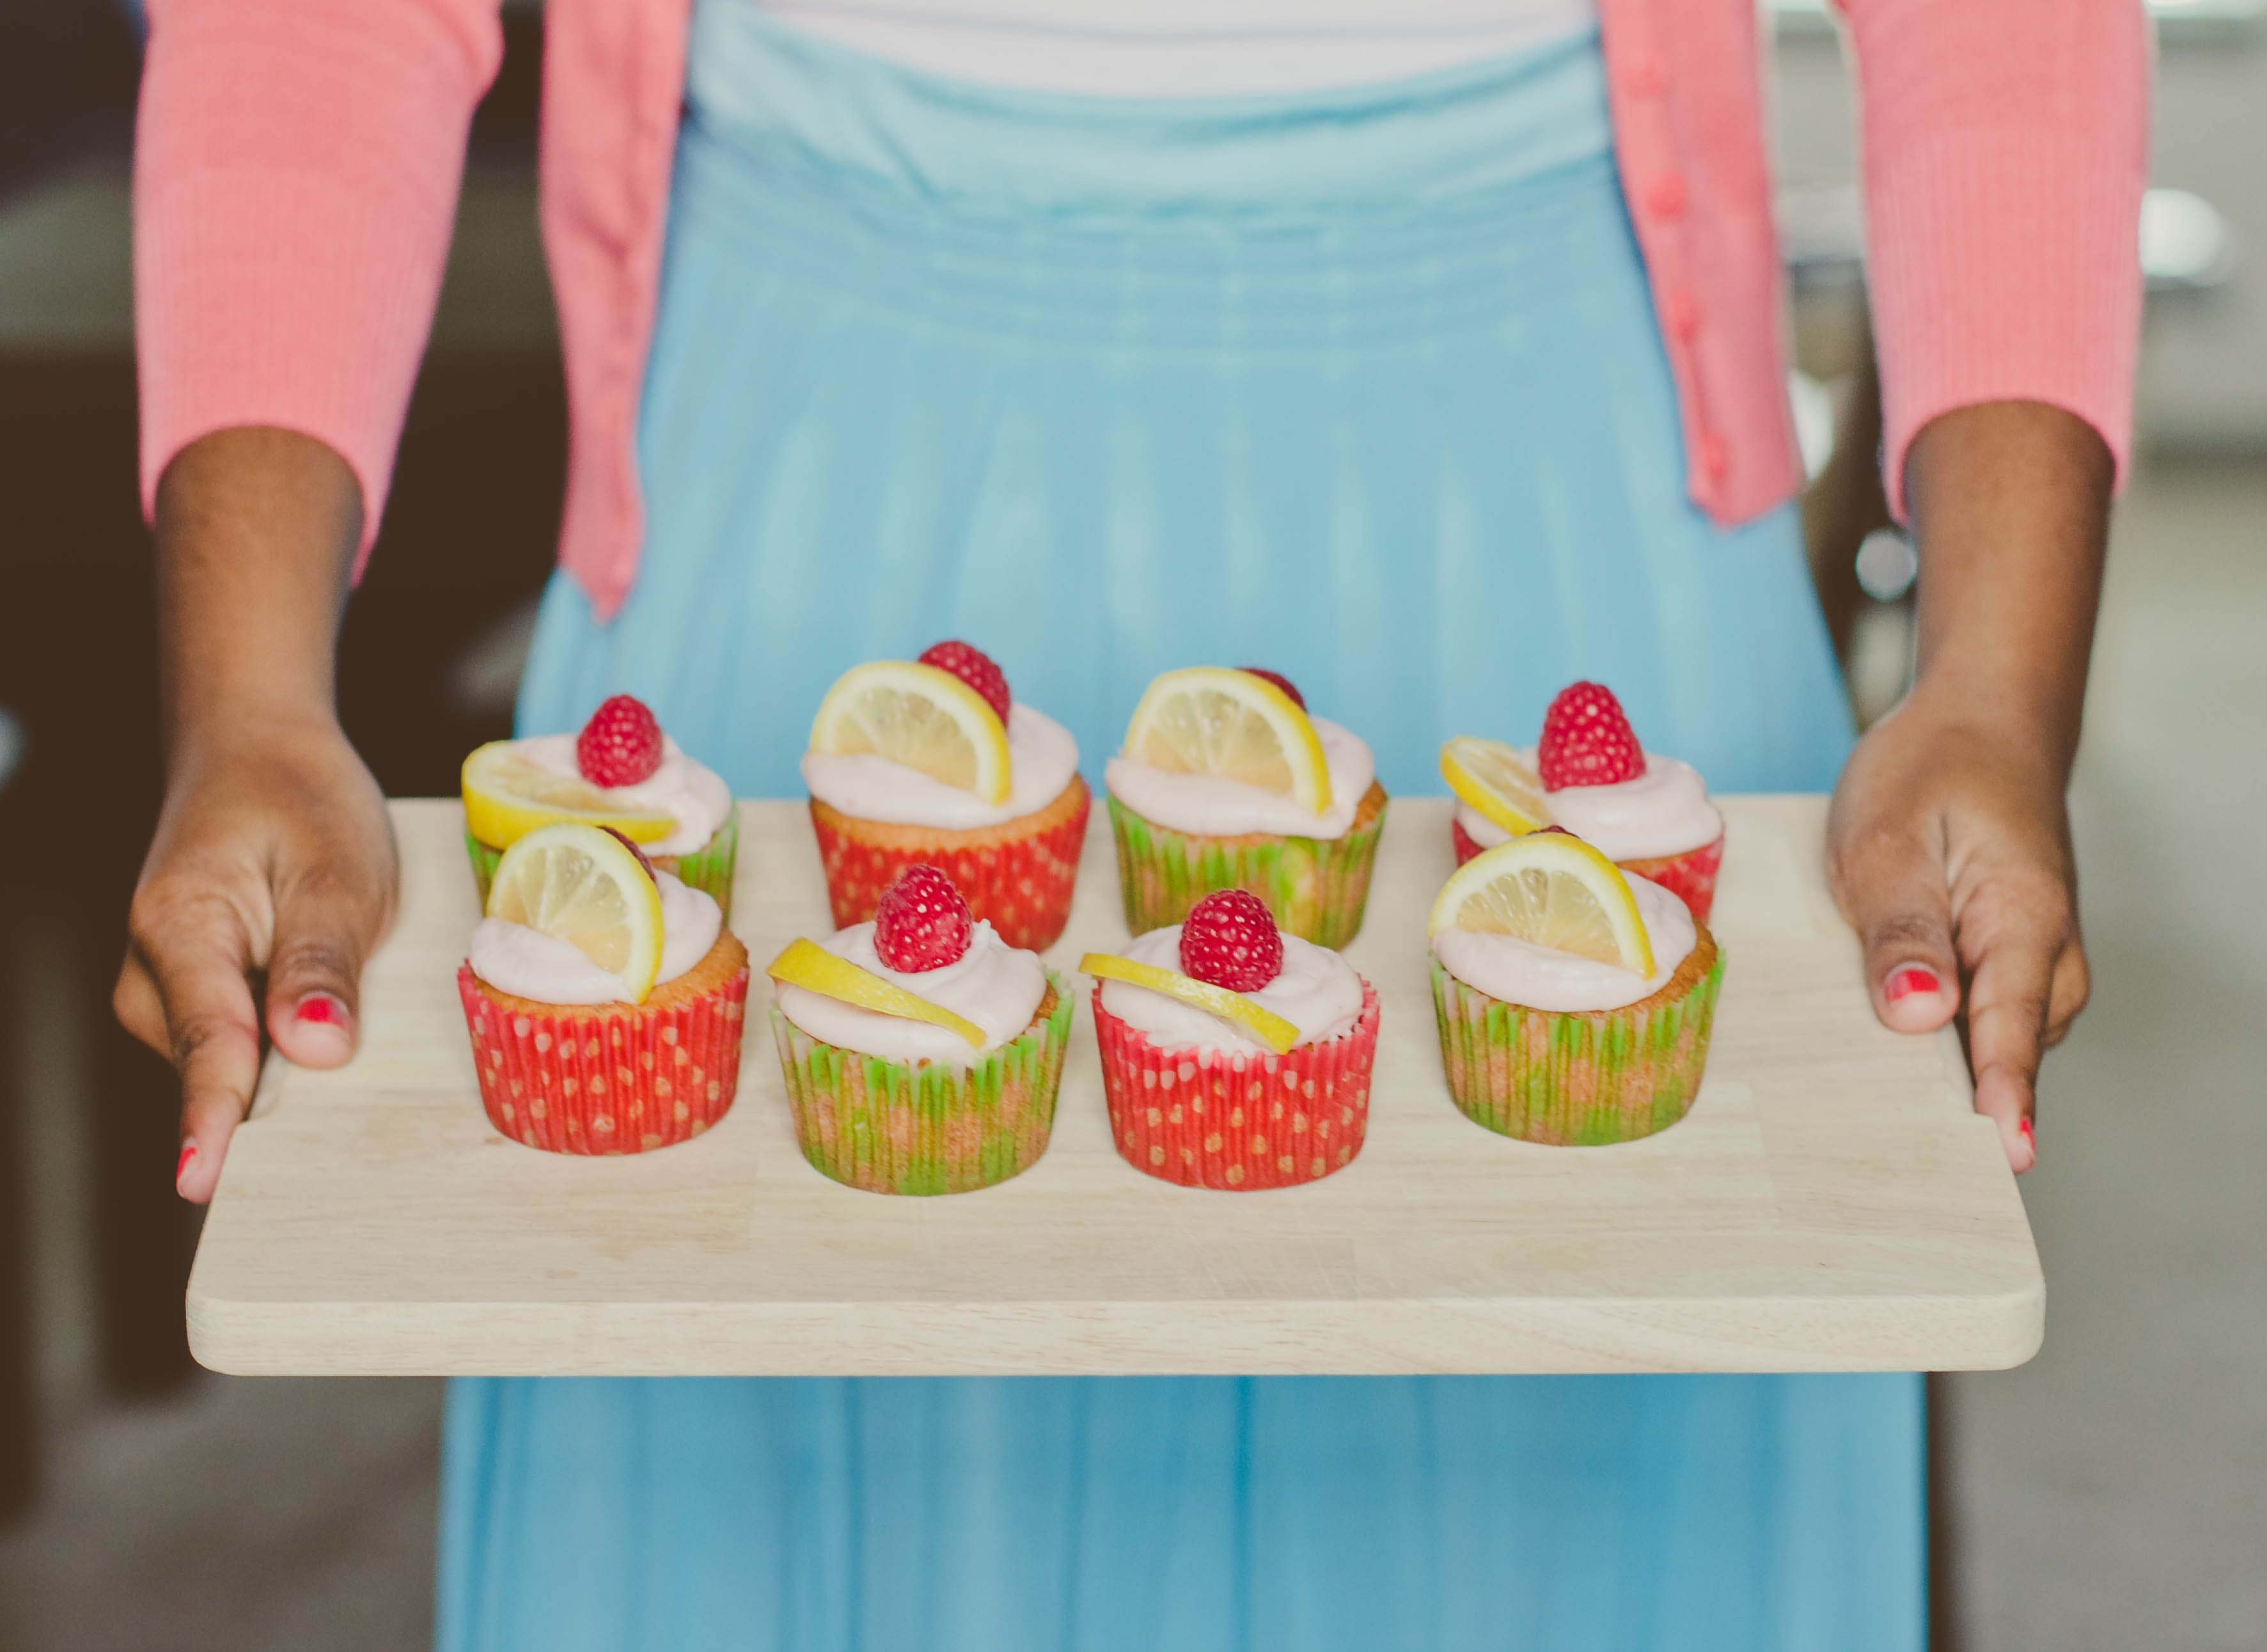
Day Four: Kitchen
{Tonight we’ll be entertaining guests so I baked us up a batch of raspberry-lemon cupcakes. They look so cute and taste so guud. Can’t wait for dinner! Lol}
My first attempt at making donuts was a failure. I found the recipe online and they were suppose to be baked. I think they were called apple baked donuts or summin. Anywho, I wasn’t going to allow one failed attempt the discourage me from trying them again.
While browsing one of my favourite blog sites, A Beautiful Mess, I found a super easy recipe for making donuts! Just my luck right?
So here’s what you need and how you do it.
1. Store bought canister of biscuits.
Biscuits(♪)")
{I actually had a canister of butter crescents so I used that instead but either shall do. Also, I added a bit of flour to my surface so that the dough won’t stick to it}
2. Roll dough out and cut donut holes. A cookie cutter or drinking glass or cup would suffice.

3. Heat oil for frying. You can use the donut holes to test the oil’s temperature.

4. Fry until golden brown.

{After frying, let cool}
5. After they are completely cooled, glaze and decorate.

{mmm mmm good…}
6. Finally… enjoy!

{Lick your fingers good}
For your dough you will need:
-1 or 2 store bought canister of biscuits (I got 10 donuts from my one canister of crescents)
-A little flour for rolling
-Enough oil to fry your donuts
For glaze you will need:
-2 cups powdered sugar
-3 tablespoons hot water
-2 tablespoons milk
-1/2 teaspoon vanilla extract (use clear extract for white icing)
Mix all ingredients together in a bowl and dip donuts into glaze. Place on a cooling tray until glaze is set.
Go forth and make donuts!

Light {Time for a Mid-Night snack}
Once upon a time, I avoided lemon flavoured desserts. It seemed wrong to me that dessert would be made with lemons. They’re acidic and too tangy people! They will just ruin the perfect dessert!
Silly Candice. One should not make an opinion about something unless one has tried it thyself. Then one is granted all privilege to make judgements on said thing.
My view changed when I had a slice of Lemon Meringue Pie from a friend. I was in disbelief that something so err …unpleasant… would make my taste buds dance and sing to the heavens! “If lemon be the food of love, eat on!” Sayeth my tongue.
On Sunday night, I decided to try Lemon Bars. We were expecting my uncle for dinner and I needed a dessert that was little prep and little bake time. On my first attempt I made one blunder. In the original recipe, the baker made her bars in a 9 x 13 pan. I on the other hand, made mine in a rectangular shaped cupcake baking pan. So the dimensions were smaller. Shamefully, I baked my bars in the same amount of time it took the 9 x 13 pans and burnt them all. *hangs head in shame* They were surprisingly good though. My uncle ate and licked his plate to boot. No, that last part did not happen but he said it was good and ate all of it!
Two tablespoons of perfection, a cup of determination and a constant nagging in my head pressed me to revisit the recipe with minor alterations. I baked the crust in half the original time but baked the filling in its original time, which equaled to SCRUMDIDDLYUMPTIOUSNESS!
P.S. I also halved the original recipe.
Here! The recipe [plus pictures] for all, from Bakerella.
Lemon Bars
Crust:
1 cup butter
1 3/4 cup flour
2/3 cup confectioner’s sugar (plus more for dusting)
Topping:
1 1/2 cup plain sugar
1/4 cup flour
1 tsp baking powder
4 eggs, slightly beaten
1/2 cup lemon juice
Preheat oven to 350 degrees
Grease and flour a 9 X 13 pan
To make crust:
To make topping:

{Getting my hands dirty. Pressing the crust into the pan}

{They look so ugly when they’re done. Urgh. I will spare you the details of my sister’s description of them}

{Half a cup full of powdered sugar helps the lemons go down -tehe}

{Bon Appetit}
What do you do when you have two week old bananas in your kitchen? Make banana bread of course!
This is our favourite recipe for Banana Bread. We got it from our Newlywed Kitchen Cookbook.
In this recipe, we used a special ingredient, which renders many baked goods incomparably moist!

{Sour Cream – mmm… mmm… good}

{It was quick and easy to prepare}

{Be sure to put a little extra for nibbling after you’ve put into the mixture – hehe}

{I bought this cute mini rectangular muffin pan especially for my banana bread baking. I also made the brown paper holder myself. Will be sure to share, how to, in another post}
Chunky Monkey Banana Bread
What you need:
2 c. flour
¾ tsp salt
½ tsp baking soda
1 tsp baking powder
1 tsp ground cinnamon
½ c. (1 stick) unsalted butter, softened
¾ c. light brown sugar
¾ c. granulated sugar
2 tsp vanilla extract
1 ½ c. (about three large) mashed overripe bananas
1 c. full-fat sour cream
2 large eggs
½ c. chopped walnuts
½ c. semisweet chocolate chips
How to make:

{Bon Appétit}
I think its prime time I started sharing some recipes with you folk. All that talk and no recipes in a week? How shameful. I won’t give you any fancy excuses but please sit back, relax and try not to droll on your computers 😛
Remember these bad boys?

{I love twice baked potatoes! When I was a child, I would sit at the kitchen table and look at my mom as she prepared them. I remember I was always in a hurry to eat them and wish they didn’t take so long to cook.}

{Canoe Tatoes}

{Out of the oven and ready for eatin’}

{We had ours with shrimp kebabs}
Twice-Baked Potatoes
Ingredients
10 small potatoes
1 1/2 c. Mozzarella cheese
2/3 c. Green onion (Chive), diced
1/2 c. Sour cream
3 tbsp. unsalted butter, melted
1 tsp. garlic, ground
1 tsp. cayenne, ground
1 tsp. black pepper
1/2 tsp. salt
extra virgin olive oil for finishing
Preheat oven to 400°.
Thoroughly wash and dry the potatoes. Poke the tops of each potato several times with a fork and place on a baking sheet. Bake until tender to fork’s touch. It took me about 1 hour & 20 mins at 400° to get my potatoes baked to the right consistency. Your potatoes may require more or less time depending on many factors. Just be sure that, you bake the potatoes to a fork-tender consistency on the inside before moving forward with the twice-baking part.
As soon as potatoes are ready, remove them from the oven and set aside until cool enough to handle. Once cooled, carve out the tops of each potato canoe-style, then carefully remove the insides to a bowl. (I mashed mine a bit before adding the other ingredients to help get rid of the chunks). After all of the potatoes have been hollowed out, add the sour cream, melted butter, black pepper, salt, garlic, and cayenne and mix together. Fold in the shredded cheese and diced onion.
Scoop the filling mixture back into the hollowed shells, packing each shell generously with the filling. The potatoes will likely be stuffed and overflowing – that’s a good thing. Place the refilled shells onto a rimmed baking sheet and finish each with a pinch of salt and a drizzle of olive oil. Bake for another 20-25 minutes or until the tops begin to turn golden. Remove baked potatoes and serve immediately.
YIELD: 10 very stuffed potatoes
This recipe was adapted from Scarletta bakes.
Marriage… has been fun so far. One of the things we enjoy most is cooking. Before we were married, Robert and I did cook alone/with family and each other. Interestingly enough, I disliked cooking when I was a teen. I couldn’t stand being in the kitchen at all. I hated the heat from the stove, the mess that would be made and the dishes to do after. Urgh! It was just too much work. I think what also contributed was that I was learning. My mom was my teacher and she wanted things done her way and perfect… typical… lol.
As I got older and was more comfortable in the kitchen, I soon realised that I did enjoy cooking but doing it by myself. I liked having all the space to myself. Getting to put what I wanted in the dish and experimenting. Tasting my masterpiece when it was done and feeling satisfied that my family/friends enjoyed it too 🙂
When Rob and I started dating one of the first things we learnt about each other was that we enjoyed cooking. The first dish we made together was a Beef & Broccoli Stew. Easy and delicious. The more we cooked the better we got at it. I’m not saying we’re pros but most things we cook, we and others enjoy… and want seconds… and thirds, lol. I also realized that I love having Rob’s company while in the kitchen. It was different to my mom’s. It’s still very pleasing to cook on my own, but if Rob’s the company, I gladly welcome it.
Oh boy. I got carried away in my story telling and almost forgot the point of this post. The Newlywed Kitchen. Simply put, sharing some of our favourite recipes with you. But first… a little photo tour of our kitchen. The kitchen is one of my favourite rooms of our new apartment. The colours are so warm and welcoming, its roomy and comfortable and its where the food is. What’s there not to like?
Do enjoy the snap shots below 🙂

{Our time teller}

{The Fridge, some cupboards and storage baskets}

{I’m jar-sitting for a friend… seriously… lol}

{Our handy-dandy toaster}

{The very vintage kettle was a present from my granny}

{Rob bought the cutest little grill & he would be using it everyday if I gave him his way…}

{I decorated the kitchen in autumn colours. Shopping for items was a lot of fun}

{I got this cute little tea set from a close friend’s mom. Isn’t it adorable?}

{Must haves for the husband}

{Another must have for the home}

{Our Plantains and Avocados look ready for eating!}

{I plan to make twice baked potatoes with these bad boys… and yes, I will share the recipe with you!}
Hello ladies & gents!
It’s mid week! Two days till the weekend AND 31 days till I’m married! Woohoo!
Tomorrow I start my 30 day count down until the big day. Until then, please enjoy a short video I made of breakfast this morning. There is much to be improved in my video taking skill. I won’t mention some of the flaws but if you do notice then, let’s keep it our little secret 😉
Yesterday Rob and I took the day off from work to get some wedding stuff done. When we finally got home in the late afternoon, I realized that I had some time before dinner to get a couple shots for the Daily Challenge. I have been so bad at keeping up with the challenges lately. No time, no energy, no enthusiasm. I really appreciated yesterday’s day off even though we were busy running around… It was a nice change from the usual weekday routine of wake up, get ready, eat, work, home, cook, read, late night wedding planning, sleep, Start over.
I really, really wish we had one extra day in the weekend. One can dream.
{June 12th Challenge: Macro/Close Up}
My photos are not macro but were taken as close as I could get with my nifty fifty [I so need some new lenses – in due time]. I went about taking as many pics as I could before it got too dark out.

{The itchy bush. Just looking at it makes you itchy – lol}

{The kitchen window}

{I really loved the light here}

{Rob pooped out on the couch after our long day}

{One Box-O-Goodies. Our wedding invitations *grin*}

{I love this collection of seashells and pebbles. It really does make a lovely dresser decoration}

{Wine and cookies?}

{My daily collection of car rubbish. This is probably one of Rob’s pet peeves atm – lol}

{Stand pipe in the front yard}

{Cactus}

{My favourite of the shots. I found this little creepy crawly while I was out in the yard looking for some good snaps. If you poke it with a stick or your finger it curls up into a little shell-like-thing}

{Weeds in the Wall}
